This text emphasizes the importance of understanding burst pipe causes for effective prevention and repair. Key factors include frozen pipes, corrosion, high water pressure, and substandard materials. Regular maintenance like insulation is crucial, as is immediate action upon detecting leaks. Proper repair involves identifying root causes—corrosion, pressure issues, or material failure—and using appropriate techniques and tools. A step-by-step guide walks you through repairing burst pipes, from shutting off the main supply to testing for leaks. Proactive measures like insulation and pressure control significantly reduce pipe damage risk. Quick action is vital, but DIY repairs should be avoided unless confident; professional plumbers offer specialized knowledge and lasting solutions.
“Pipe repair is a crucial aspect of home maintenance, especially addressing burst pipes. This comprehensive guide delves into the root causes, offering insights on ‘understanding burst pipe causes’. We’ll walk you through ‘assessing the damage’ and equip you with the knowledge to identify the ‘tools and equipment required for repair’.
From step-by-step repair instructions to prevention strategies, we cover it all. Learn when it’s time to call a professional plumber and gain the skills to tackle burst pipe issues effectively.”
Understanding Burst Pipe Causes
Burst pipes are a common household issue, often causing significant damage and requiring immediate attention for effective pipe repair. Understanding the causes behind these bursts is key to preventing future incidents. The primary culprits include frozen pipes, where the expansion of ice within pipes leads to their bursting, especially during cold winters. Corrosion over time can also weaken pipe structures, making them more susceptible to ruptures under pressure. Another common cause is high water pressure, which can exceed a pipe’s capacity, resulting in a burst. Additionally, pipes made from older materials or those with poor installations are more prone to bursts due to inherent weaknesses or defects.
Regular maintenance and insulation during cold seasons can help prevent frozen pipe bursts. For pipe repair, identifying the specific cause is crucial. If corrosion is the issue, replacing the affected section may be necessary. In cases of high water pressure, installing pressure regulators can mitigate the problem. Prompt action and proper repairs ensure minimal damage and costly renovations are avoided, keeping your home safe from unexpected pipe-related disasters.
Assessing the Damage
When dealing with a burst pipe, the first step in any pipe repair process is assessing the damage. Start by locating the burst and identifying the extent of the leak. Inspect the pipe for visible cracks, corrosion, or signs of wear and tear. Check nearby walls, floors, and ceilings for water stains or mold growth that might indicate the leak’s severity.
Take note of the type of material used in the pipe, its age, and any previous repair work. These factors can influence the complexity of the pipe repair process and help you determine if professional assistance is required. Additionally, consider the shut-off valves located near the burst to control water flow before beginning any repairs.
Tools and Equipment Required for Repair

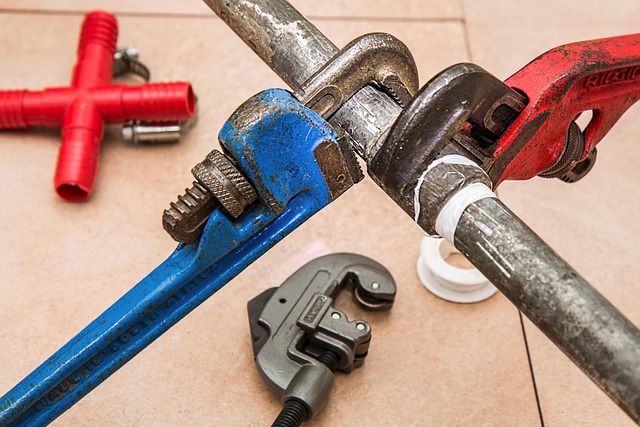
When it comes to repairing a burst pipe, having the right tools and equipment is essential for a successful and efficient fix. The first step in any pipe repair involves assessing the damage and gathering the necessary materials. Basic tools such as wrenches, pliers, and a hammer are often required to remove and replace damaged sections of piping. For more complex jobs, you might need specialized tools like pipe cutters, reamers, and thread tape to ensure a secure and lasting repair.
Additionally, consider having a supply of replacement pipes, couplings, and valves specifically tailored to your plumbing system. Using the right materials compatible with your existing pipeline is crucial to prevent future leaks. Always check for any specific tool requirements based on the type of piping in your home or building, as different materials may demand unique repair techniques and tools.
Step-by-Step Guide to Repairs

Repairing a burst pipe is a crucial task that can save you from potential water damage and high repair bills. Here’s a step-by-step guide to help you navigate this process effectively.
1. Locate and Turn Off Water Supply: Before beginning any repairs, it’s essential to identify the affected pipe and shut off the main water supply to prevent further leakage. Check your home’s plumbing diagram or locate the shut-off valves beneath sinks and appliances. Once found, turn them clockwise to stop the water flow.
2. Inspect the Damage: Carefully examine the burst pipe to assess the extent of the damage. Look for cracks, corrosion, or signs of wear and tear. This step is vital as it determines the type of repair needed—a simple clamp or a complete replacement.
3. Gather Necessary Tools and Materials: Depending on the pipe’s condition, you might require a pipe repair kit, new pipes, clamps, tape, or primer. Ensure you have everything before starting to avoid interruptions in your repair process.
4. Remove the Burst Section: If the damage is severe, cut off the burst section of the pipe using a saw or a pipe cutter. Make sure to wear protective gear during this step for safety.
5. Prepare the New Pipe (if necessary): If you’re replacing a section, clean and debur the ends of both the old and new pipes to ensure a smooth connection.
6. Connect and Secure: Fit the new pipe or repair clamp into place, ensuring it’s tightly secured. Use primer to seal any joints and prevent leaks.
7. Test for Leaks: After completing the repairs, turn on the water supply and check for any leaks. If everything seems secure, you’ve successfully repaired your burst pipe!
Prevention Strategies
Preventing burst pipes is a crucial aspect of maintaining your home’s plumbing system and can save you from costly repairs. Regular maintenance is key; checking for leaks, especially around fittings and valves, should be a routine task. Insulating exposed pipes, particularly in colder climates, is an effective measure to prevent freezing and subsequent bursting. This simple step can act as a buffer against extreme temperatures.
Additionally, keeping an eye on water pressure levels is essential. High pressure can lead to pipe damage over time. Regularly checking and adjusting pressure valves ensures a healthy plumbing system. Using heat tape or thermal insulation around pipes in vulnerable areas can also prevent sudden freezes, which are a common cause of burst pipes. Implementing these prevention strategies will go a long way in ensuring smooth Pipe Repair and maintaining your home’s overall plumbing integrity.
When to Call a Professional Plumber
If you notice signs of a burst pipe, such as water damage on walls or floors, excessive moisture in the air, or a constant hissing sound, it’s crucial to act quickly. However, before attempting any DIY repairs, it’s essential to consider when it’s time to call a professional plumber. Pipe repair experts are equipped with the necessary tools and knowledge to handle complex issues that may not be apparent to non-professionals. They can identify hidden damage, prevent further leaks, and ensure long-lasting solutions.
Professional plumbers are particularly recommended for severe pipe bursts, as they can navigate through narrow spaces and access hard-to-reach areas. They also offer expertise in understanding the specific materials and methods required for different types of pipes, ensuring a safe and effective repair. Additionally, professional plumbers can provide valuable insights into preventing future burst pipe incidents by offering maintenance tips and recommending suitable piping systems for your home or business.